Recently, I have been wondering about the communication protocols used in small satellites like CubeSats. After all, these satellites are made up of multiple modules that must communicate effectively with each other in order to successfully carry out their mission. Furthermore, the entire satellite must also establish a connection with the ground station in order to receive telecommands sent to it and to send back telemetry data in response. While searching for phrases such as “satellite communication protocols” or “cubesat communication protocols”, I came across terms such as CCSDS, AX.25, KISS and finally, CSP.
What is Cubesat Space Protocol?
CSP, a small network-layer delivery protocol developed by a group of students from Aalborg University in 2008, was further developed for the AAUSAT3 CubeSat mission that was launched in 2013. It is designed to ease communication between distributed embedded systems in smaller networks, such as CubeSats, by enabling a service-oriented network topology in which there is no distinction between master and slaves. All subsystems can communicate with each other. The implementation is written in C for 8-bit AVR and 32-bit ARM microcontrollers.[1,2]
Some key features:
- API similar to Berkeley sockets
- FreeRTOS and Linux support
- CAN, I2C and KISS interfaces
- Zero-copy buffer and queue system
Cubesat Space Protocol is still actively maintained by Johan de Claville Christiansen.
Clone and build
To avoid making a mess on my main operating system, I installed a fresh version of Ubuntu 22.04 LTS within VirtualBox. This way, I can also check the dependencies and additional modules that I need to install in order to work with the protocol. In my development directory, I began by cloning the CSP source code repository and attempting to build examples using the existing script prepared by the authors. At the time of writing this post, I obtained the [b2996d2] commit from the development branch.
git clone https://github.com/libcsp/libcsp.git && cd libcsp
./examples/buildall.py
Of course, I ran into some missing module errors. It took me a few tries to finally get everything built successfully. Here is a command to install all the needed modules.
sudo apt install python3 python-is-python3 build-essential pkg-config libsocketcan2 libsocketcan-dev libzmq3-dev libzmq5 Run
The first time I ran the csp_server_client example, I got an encouraging view.
./build/examples/csp_server_client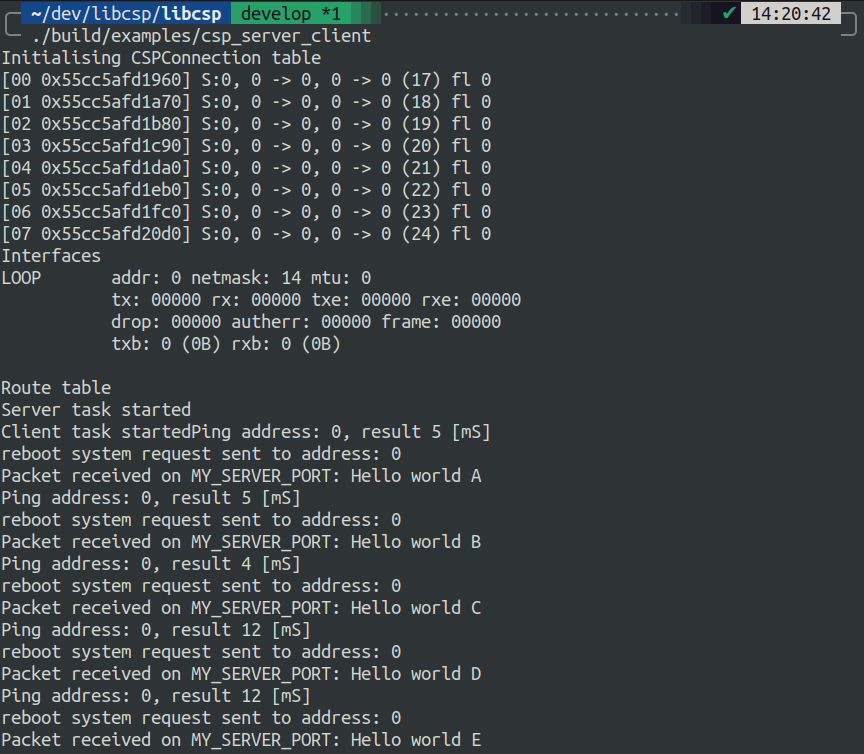
This is an output from server and client tasks communicating with each other via the loopback interface. I could see that something was happening, but to really understand how it was done, I took a look into the code.
What’s in the code
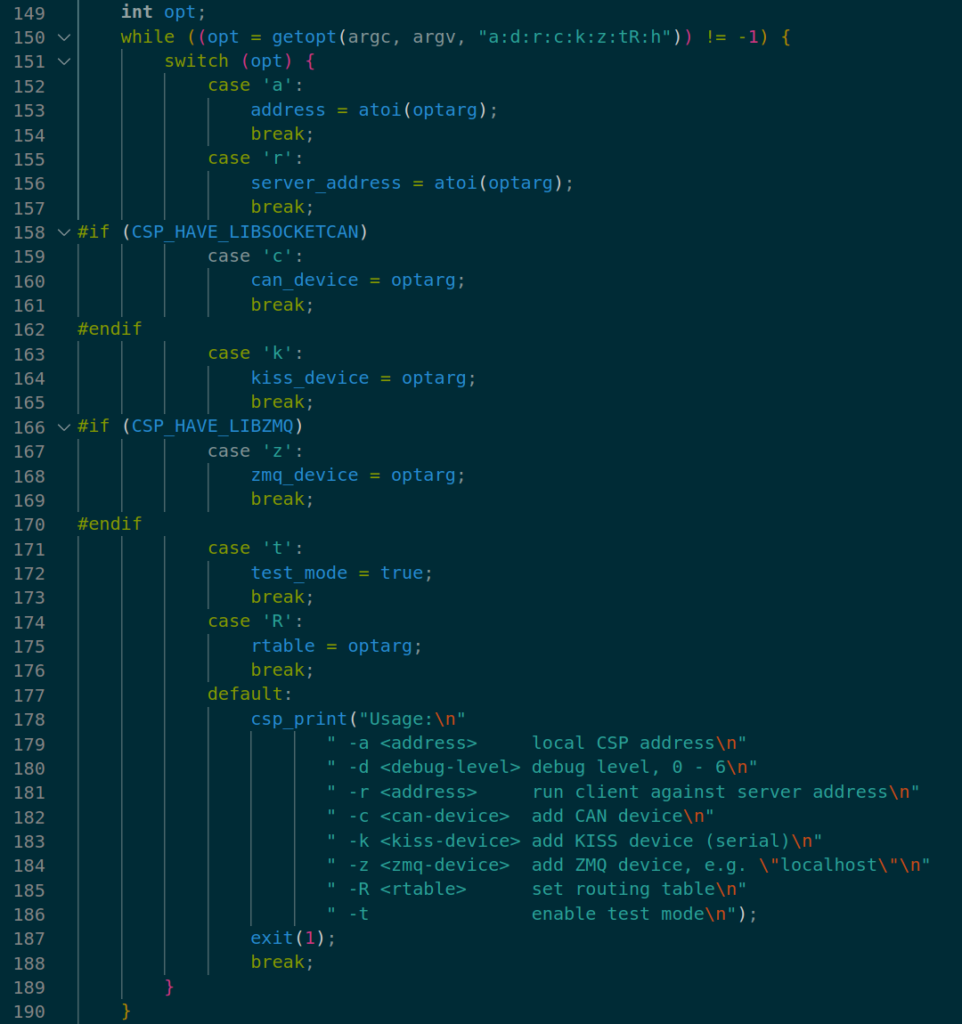
At the beginning, the application parses command-line arguments if applied. Although I found out the application is a little bit outdated and missing some things, it is possible (or at least was in the past) to set things like:
- local address
- server address
- interface devices (KISS, ZMQ, CAN)
- routing table
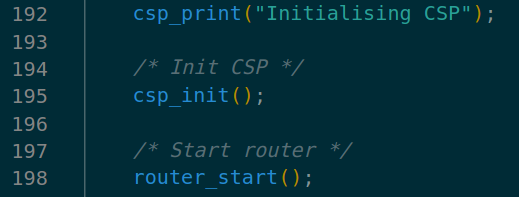
Next, the CubeSat Space Protocol is initialized and a router task is started. From now on, the router is checking for incoming packets. If a destination address matches the local node ID, some additional checks are done before delivering the packet. However, if there is a destination address mismatch, then the router tries to pass on the packet to the recipient using the proper interface found in the routing table.
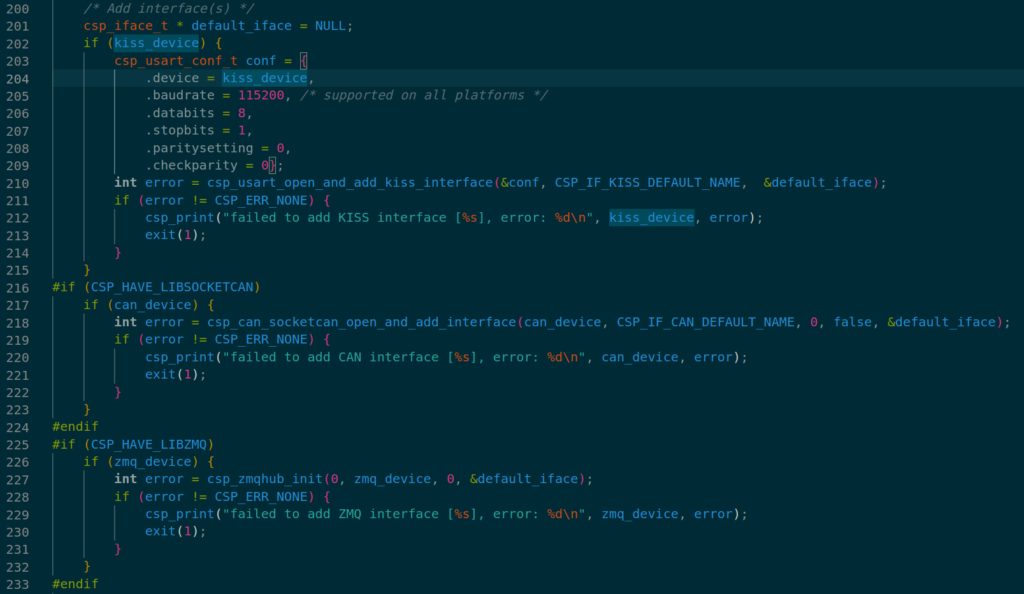
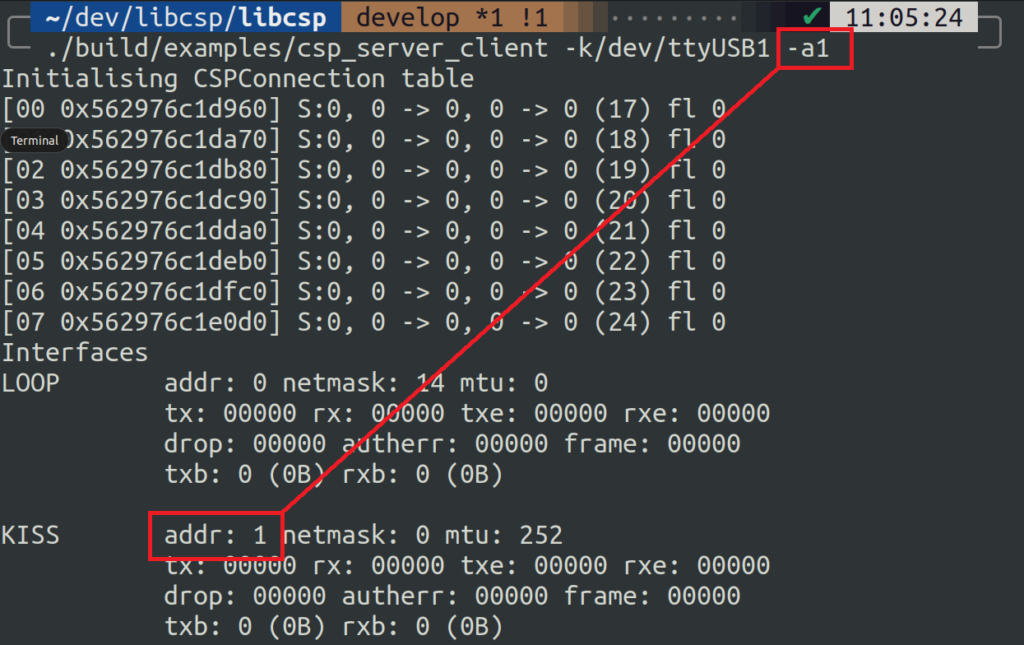
Depending on the command-line arguments used, the appropriate interfaces are configured. For example, if the name of the USB<->UART converter is provided during startup, the KISS interface will be configured as the default. For example, during startup, it is enough to add -k/dev/ttyUSB0, so that the router starts directing sent packets to that device.
./build/examples/csp_server_client -k/dev/ttyUSB0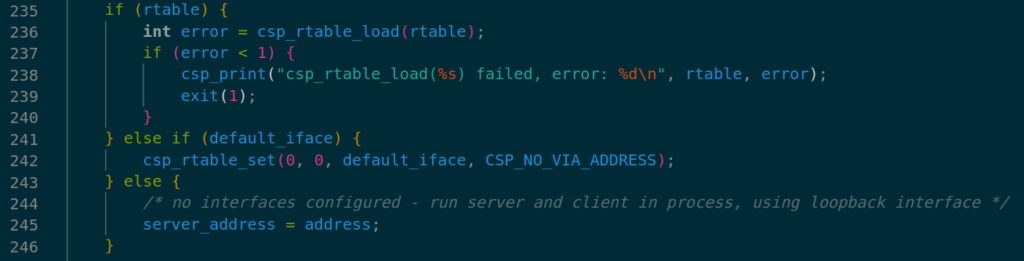
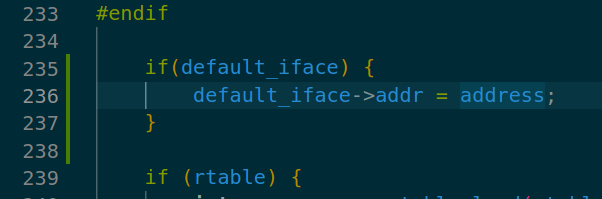
Then, in lines 235-246, if the user runs the application with their own routing table specified, it is loaded. In other cases, the default interface is used for the configuration table, to which all outgoing traffic is directed. If such an interface does not exist, all packet transfer will take place through an internal loopback.
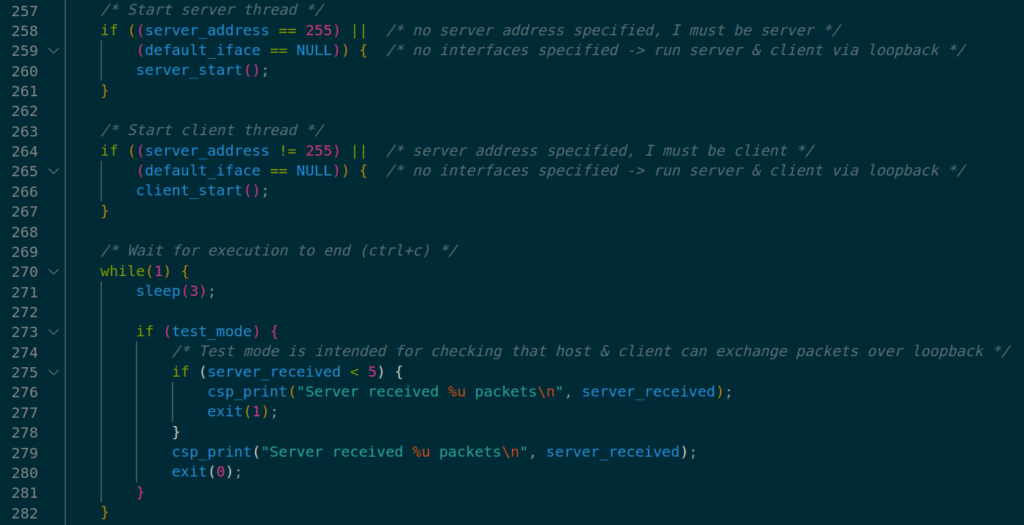
And finally, after all the initialization routines, both the client and server tasks are started. The former periodically sends a message to the server and tries to utilize its services, while the latter prints incoming messages and handles all requested services.
Communication over UART
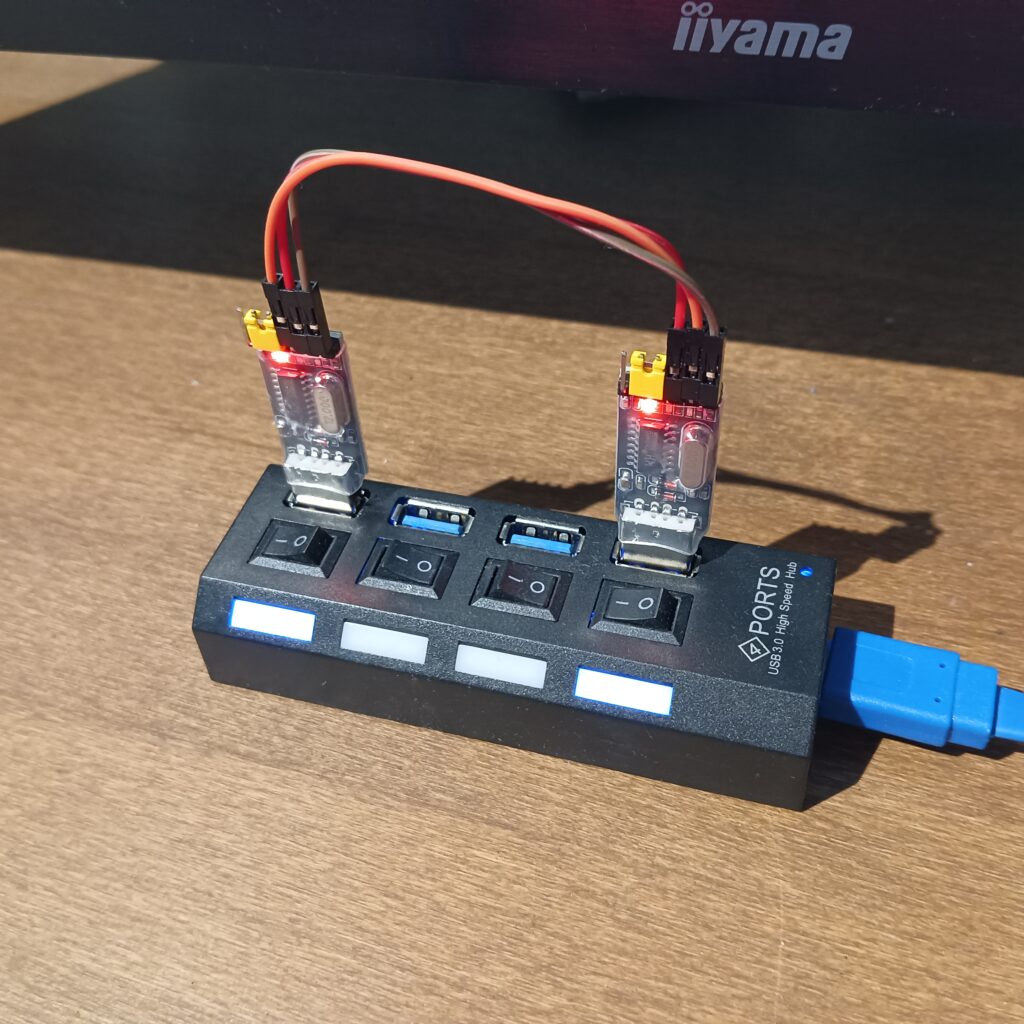
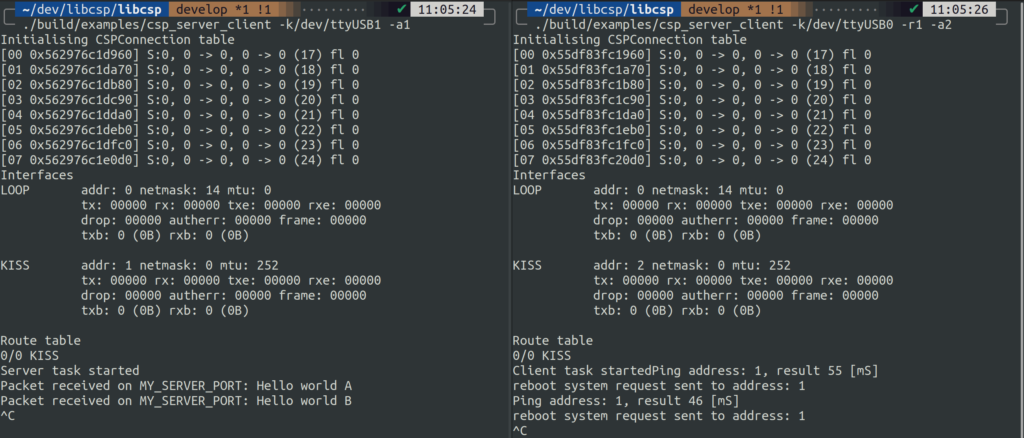
After successful application run, I decided to go one step further and try to establish communication between two instances of the application, one functioning as a client and the other as a server. To achieve this, I used two USB <-> UART converters, between which I crossed the TX and RX lines.
In the application code, I had to make a small fix. When running it with a specified local address through the -a argument, I noticed that despite providing different values, the local address always took the value of 0.
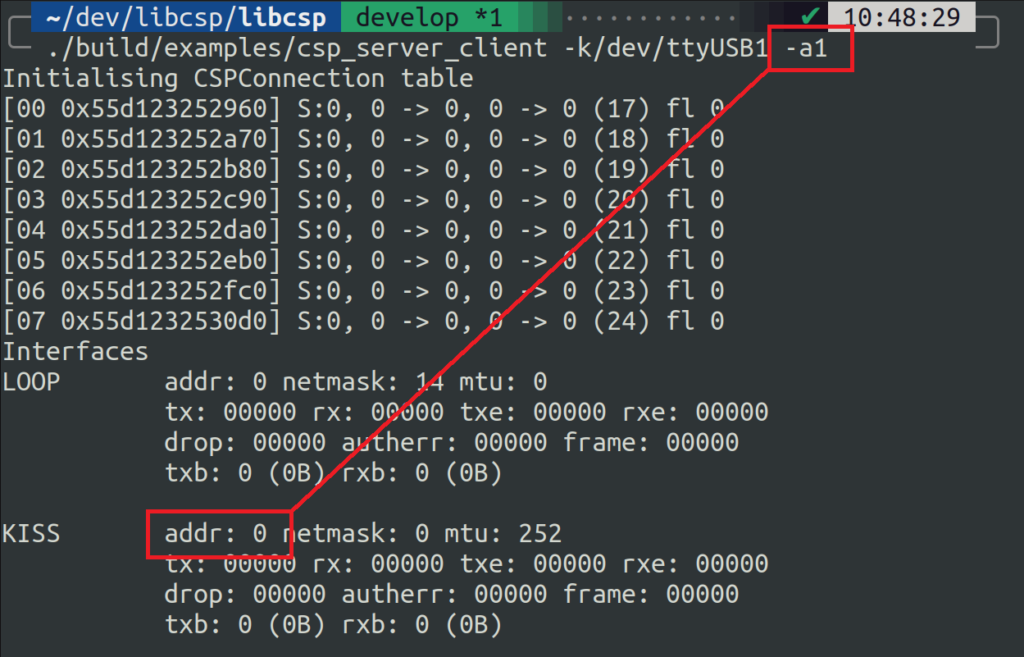
Most likely, the setting of the local address has been mistakenly removed. I added the setting of the local address for the default interface, if it is created.
As a result, after running separate instances for the client and server, communication was established.
Further steps
This is not the end of playing with CSP. Since I have several WeAct BlackPill F411CE boards, I would now like to build an imitation of a small satellite consisting of 3 modules (OBC, COM, EPS) and communicate them with the application running on the computer, as if it were a ground station (GS). Of course, all using the CSP protocol.
First, I will try to establish a connection between the COM module and the GS application. To do this, I will connect the TX/RX outputs of the USB<->UART converter to the appropriate pins on the BlackPill board. Only later will I expand the set with additional OBC and EPS modules, connecting them together with the COM module via the I2C interface. This will also require adding another interface in CSP and configuring the correct routing tables on each module.
More about this in the next post 🙂
Hi Code above team,
my self mohan.i had gone through your video on CSP.I am a learner in the embedded field.i would like to know more about this CSP framing i have a few quires can you please share your response on these?
1) In satellite, we had many subsystems with respective hardware interfaces (i2c, UART, CAN,spi,RS422, RS485, SpaceWire). I would like to know how CSP will work in telemetry data collection from each subsystem.
2)How will CSP work while telecommanding?
3) is it possible to transfer the CCSDS telemetry frame over CSP? Is it good practice?
4)my understanding in CSP framing is that Sourceport/destination port means interface(i2c,CAN, RS422), and source address or destination address means subsystem which connected to that particular interface is that correct?
Can you please give a clear explanation of these?
5) I understand that while transferring data on RS422 it will transfer using KISS framing.
In this kiss framing the command section which command we should select for data transmission can you plaese brief idea on these?
1. Most common CSP usage is to make each subsystem a separate CSP node (address). CSP interfaces use hardware interfaces (via drivers). This way each CSP node can communicate with others.
2. CSP works as OSI layers 1-4 and it doesn’t care what data is transfered in commands. For telemetry and telecommands CSP is transparent.
3. I didn’t make any research on CCSDS over CSP. It should be possible, but can’t say 100%.
4. Address is subsystem. Port is specific service in subsystem. Interface uses hardware interface. For example: Subsystem OBC with CSP address 1 sends command to subsystem EPS with CSP address 2. OBC module has telecommands/commands service bound to port 10. EPS module has telecommands service bound to port 11. All subsystems are connected with CAN network.
Source address: 1
Destination address: 2
Source port: 10
Destination port: 11
Interface: CAN
5. CSP library has KISS interface with KISS protocol implemented. You don’t have to implement this on your own 🙂
Hello LUUKE,
Thanks for your U had clarified my doubts.
Here i came up few more questionsi hope i will gets response from you.
1)suppose satellite containing may subsystems with diff interfaces
epsm——————I2C
aocs——————-i2c,rs422,rs485,CAN
propulsion————CAN
Camera—————-CCSDS over Space wire interface
comms—————-CSP over RS422
My question is transponder will supports CSP format only how we will communicate between all subsytems
by using csp.and how we will transfer ccsds overCSP.
2)Can you give brief about the routing table in csp? how it will work.
3)as you said example port 10 is commanding in obc.There will be various commands are available like to
-Health checking commands
-parameters configuration commands etc
how these should be includes can you share your comments on this.
4)Any specified hardware is required for CSP . Because i have gone through few micro controllers controllers (obcs)
data sheet it tells specific hardware components to generate ccsds packets.
like this is it required any harware for csp?
5)for example if we want to transfer ccsds packets over csp .Is there any harware requriments or by using software we can transfer?
6)can we use STM32 based board for csp?
Please share your comments on these .Looking foreward for yourresponse.
Thank you .
Regards,
Mohan.
Mail::mohanpendyala244@gmail.com