This is a continuation of my first steps with the CSP protocol. I recommend reading the content of the following entry first -> https://codeabove.dev/index.php/2023/01/14/cubesat-space-protocol-first-steps/
As a reminder, in the last post I described my first run of the CSP protocol. After installing all dependencies, I was able to build a sample application. After launching it, I successfully established communication between the client and server tasks. Then, using command line arguments, I was able to establish a connection between two instances of this application using crossed USB<->UART converters.
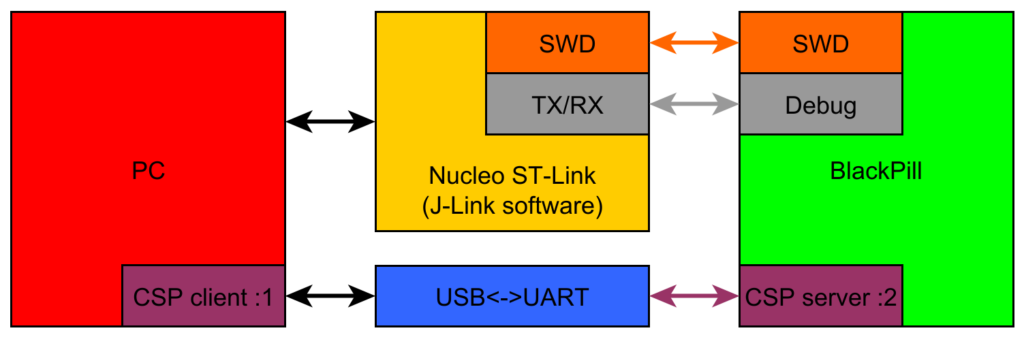
Now it’s time to connect the same application to an application running on an STM32 microcontroller. This setup will mimic the connection between a ground station (GS) and a communication module (COM). The GS application will act as a client, while the COM module will act as a server. This will also be the foundation that I will then expand by adding two more microcontrollers and connecting them all using the I2C bus.
Ok, let’s get to work!
Hardware setup
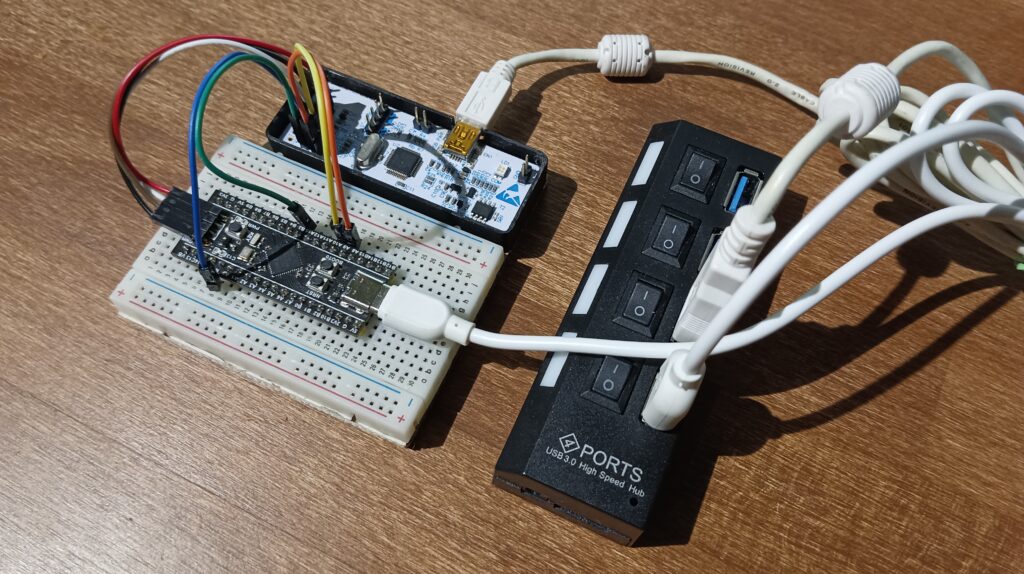
The setup is quite simple and I only needed a few components for it:
- WeAct BlackPill board with STM32F411CE microcontroller
- USB<->UART converter based on CH340G chip
- ST-Link extracted from a Nucleo module and reflashed as J-Link
- Breadboard and goldpin cables
- USB HUB
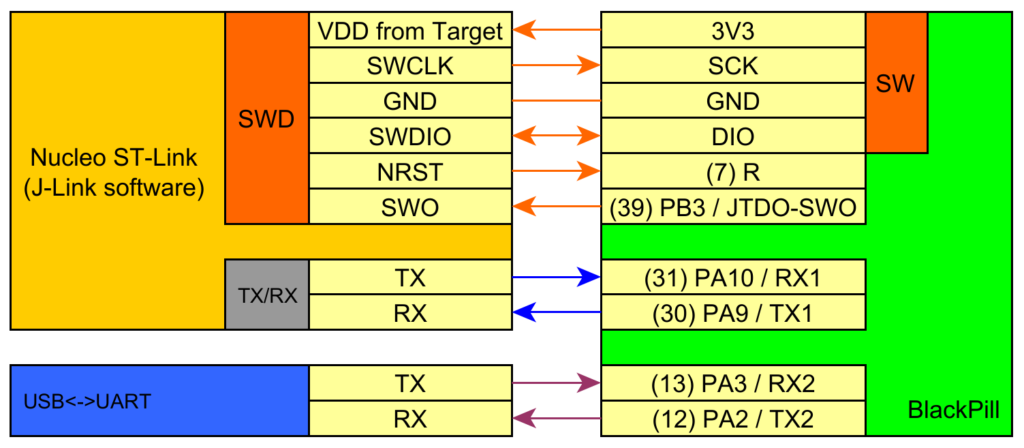
Actually, there is nothing fancy in this setup. I connected the UART1 and UART2 ports of the microcontroller to pins PA9 and PA10, and PA2 and PA3, respectively, on the ST-Link and USB<->UART converter. In addition, I connected the SWD pins on the board to their counterparts on the ST-Link.
Embedded software
RTOS selection
The software for the board emulating the COM module required a little bit of effort. At a certain level of application complexity, attempting to run everything in a single thread, such as a super loop in main, can lead to significant issues with responsiveness to external signals. In my opinion, the use of an advanced communication protocol such as Cubesat Space Protocol raises the complexity of the application to such a level. Therefore, the first step I had to take was to configure and run the real-time operating system RTOS.
Well, which one to choose? It’s worth noting that all of my previous experience with RTOS systems was limited to implementing software on the existing FreeRTOS system, as well as some small attempts with the Zephyr system.
I tried not to make the choice too difficult for myself, so I decided to choose between the systems I had already encountered and wrote down a few subjective pros and cons:
FreeRTOS
- CSP supports FreeRTOS.
- Large amount of guides, tutorials and how-tos.
- No HAL/BSP and need to implement drivers with each change of microcontroller.
Zephyr
- Huge number of supported microcontrollers.
- Easy portability between microcontrollers.
- Very steep learning curve.
- CSP port to Zephyr is for version 2.7, so it is outdated and requires an update.
In the end, I decided to use Zephyr OS. I preferred to use the time I would have spent implementing all the drivers to learn a new technology, in this case, a new RTOS.
I will skip the step of installing the entire environment for creating applications on Zephyr. A step-by-step description is available on the project documentation page.
Application development
You can find the source code of the application in the GitHub repository: https://github.com/CodeAboveDev/libcsp-zephyr
The next step was to create an application that would serve as a starting point for further work. With the help of the aforementioned documentation, I was able to quickly configure and write a program that toggles the state of an LED with a one-second interval. This LED serves as a heartbeat – indication of code execution in the main loop.
Next, I was able to configure the UART port in the microcontroller and add support for transmitting and receiving data. To do this, I had to add the file boards/blackpill_f411ce.overlay, which is an overlay on top of the existing configuration for my board. In this file, I enabled the USART2 port by changing the status field to okay and set the baudrate to 115200. I also mapped the TX/RX lines of this port to the PA2/PA3 pins of the microcontroller.
&usart2 {
    status = "okay";
    pinctrl-0 = <&usart2_tx_pa2 &usart2_rx_pa3>;
    pinctrl-names = "default";
    current-speed = <115200>;
    dmas = <&dma1 6 4 STM32_DMA_PERIPH_TX STM32_DMA_FIFO_FULL>, <&dma1 7 6 STM32_DMA_PERIPH_RX STM32_DMA_FIFO_FULL>;
    dma-names = "tx", "rx";
};
CSP as Zephyr module
After making sure that UART support is working correctly, it was time to add the CSP library to the project. A significant part of the work had already been done in the past by one of the co-authors of CSP, who added the necessary elements to make the library function as a module of the Zephyr system.
The installation of the library is done by adding the appropriate entry in the west.yml file located in the base directory of the Zephyr system repository and executing the command to update the installed modules. Additionally, in order to maintain my own modifications to the CSP library, I have forked the main repository and it is available at this address: https://github.com/codeabovedev/libcsp
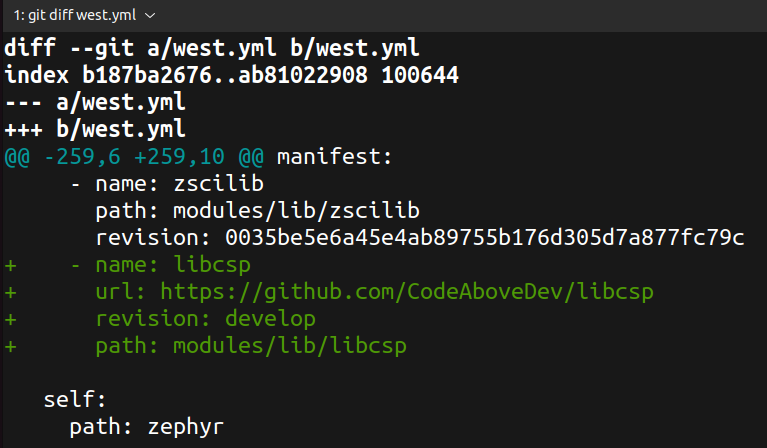
Command to call after west.yml edit:
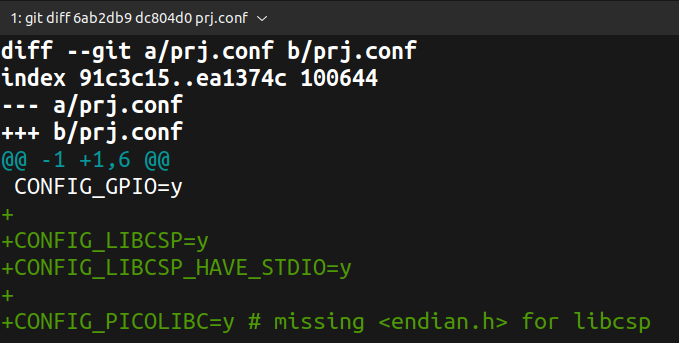
west updateTo use the library within the application, I had to add the appropriate entry in the project configuration file, prj.conf.
In the next step, I had to deal with compilation errors resulting from changes in the Zephyr system between versions 2.7 and 3.2. The structure in the include folder was modified, and all files present in this location were placed inside the zephyr subfolder. For most errors, it was sufficient to add zephyr/ to the path. However, for the zephyr.h file, which is now marked as deprecated, the include had to be changed to zephyr/kernel.h.
Here you can see all the corrections: https://github.com/CodeAboveDev/libcsp/commit/41e1209614ca745bbec0324980237a9e5f4780ee
The problem turned out to be the lack of the endian.h file in the Zephyr project. I must admit that I had no idea how to deal with it. Fortunately, while browsing issues in the CSP repository, I came across a thread mentioning the missing file and the use of the picolibc library[1]. The problem was solved after adding the appropriate entry in the prj.conf file.
After these corrections, it was possible to build the entire application! 🙂
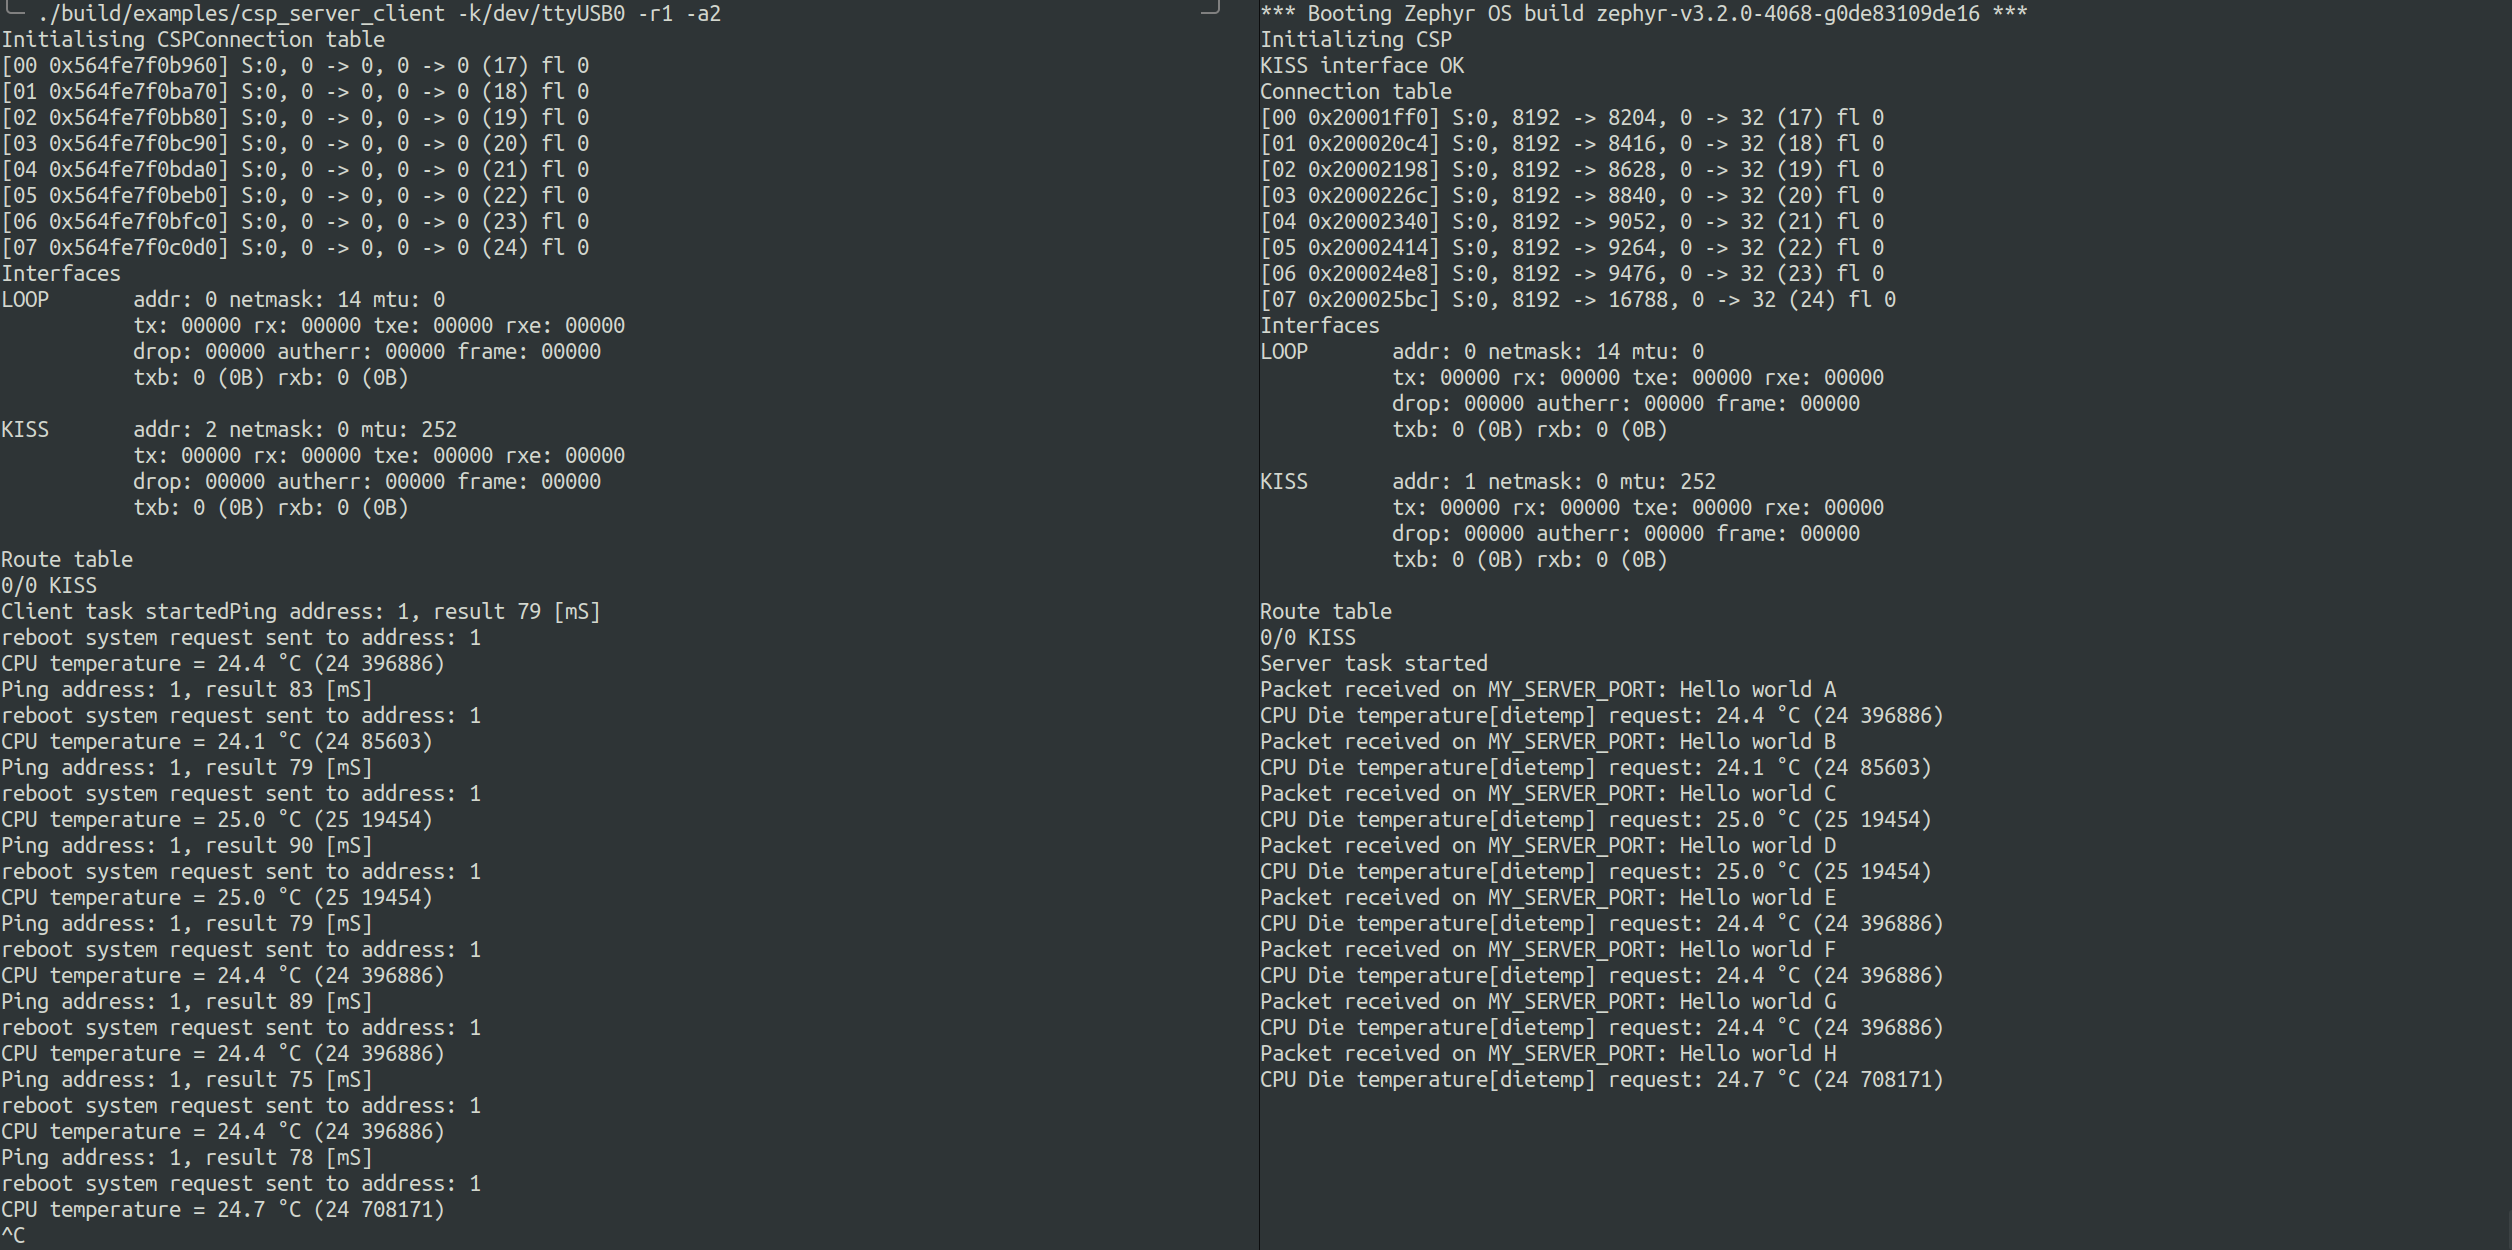
First CSP communication
The communication link between the GS and COM was established without major problems. For this purpose, I once again used a sample application from the CSP repository and its server functionality. Of course, I had to adapt the code to the Zephyr system and the specific nature of the embedded application. I removed the command-line argument handling and placed the UART port configuration in the boards/blackpill_f411ce.overlay file.
The most important things during application startup include:
- initialization of the CSP protocol library
/* Init CSP */
csp_init();- starting the CSP router thread
/* Start router */
router_start();- adding the KISS interface
/* Add interface(s) */
csp_iface_t * default_iface = NULL;

// Configure USART in devicetree and here pass NULL
int error = csp_usart_open_and_add_kiss_interface(NULL, CSP_IF_KISS_DEFAULT_NAME, &default_iface);- configuring the routing table
csp_rtable_set(0, 0, default_iface, CSP_NO_VIA_ADDRESS); - starting the CSP server thread
server_start();The missing piece in the whole setup was the module connecting the microcontroller UART with the KISS interface of the CSP protocol. I implemented the driver in the usart_zephyr.c file, following the existing usart_linux.c file, which contains a similar driver for the Linux system.
The implementation includes 3 important functions:
- csp_usart_write – passes the buffer with data to the system UART transmission handler. Used directly by the KISS interface.
- csp_kiss_uart_event_cb – handles asynchronous UART events, including passing received data to the KISS interface.
- csp_usart_open – configures and prepares the driver for sending and receiving data. It verifies the readiness of the UART port in the system and registers the csp_kiss_uart_event_cb function in the port API. From the moment it is called, bidirectional data transmission is possible.
Ground Station software
As for the ground station software, there was no need to create something new at first. The functionality of the client in the sample application in the CSP repository was sufficient. It cyclically sends three types of messages:
- ping – a message of a specified length. The time it takes to receive the same message is measured.
- reboot – an application restart command. I have a feeling that it’s a prank from the creators 🙂
- message on port 10 – a text message that my COM displays in the console.
First telemetry
After successful reception of ping and text messages, I added support for a new port in both the GS and COM applications. On the GS side, I added sending messages on this port as well as receiving and displaying the contents of the response. On the COM side, I added the ability to retrieve values from the internal temperature sensor in the microcontroller and send them as part of the response.
Further steps
Yet again, this is not the end of playing with CSP. Now it is time for the final step. I will now expand the set with additional boards to create a small satellite imitation assembly and establish communication over I2C and CSP with all three modules (OBC, COM, EPS).
Hi CodeAbove! Thanks for you blog entries, this is quite informative about CSP! 🙂
I’m dealing with the design of a MCS at the moment and I would like to include CSP in this process.
My questions are:
1) Just from the design point of view: How can CSP be connected between a GS CubeSat (What are both the requirements and connections where CSP docks to GS and CubeSat?)
2) Can a MCS also receive the data from a GS via CSP or how does the received data normally being received in a MCS?
3) As I understand it, the CSP has a header that classifies a certain data packet. And below this header there can be encrypted data in ECSS format, for example. Is that correct?